Job Ad Promotion & Payment Details
With Monster+, you choose the right amount of exposure for every job you post. Select a budget that works for your hiring need, and we’ll get it in front of the right candidates – on Monster’s website, mobile app, and extensive partner network. We’ll even deliver your jobs directly to candidates that are searching for similar roles.
The information in this article will show you how to do it all. Click a topic below to learn more about promoting jobs with Monster+.
Flexible Promotion Budgets
When hiring needs change, as they often do, your budget can follow suit. At a moment’s notice, you can start, stop, and adjust your promotion budget, right from the Monster+ platform. With this kind of flexibility, it’s easy to prioritize your hiring efforts.
- Consider a higher budget to boost exposure for those urgent or hard-to-fill roles.
- Prioritize spend and make adjustments for positions that don’t take precedence right now.
- Stop the promotion when you find “the one,” then reevaluate the next priority’s budget.
![]()
Daily Average Budget
After you finish creating a new job posting, you will be prompted to Choose a Budget. You can select the Daily Average Budget that works best for your hiring need. To help determine your budget, you’ll see daily and weekly pricing estimates, as well as an estimate of how many applications you may receive over the promotion duration.
Remember, Monster+ is billed on a cost-per-click (CPC) basis. Your Daily Average Budget is, in fact, an average, and daily costs will fluctuate based on several factors, including opportunities to maximize visibility, as well as candidate views, clicks, and applies.
Just know you will never be charged beyond the total spend you indicate through your promotion selections (plus tax). This is calculated by multiplying the Daily Average Budget by the 30-day promotion duration.
($12 Daily Avg. Budget) x (30 Day Promotion) = $360 Total Spend
-

If you see a spike on a particular day, these variables are typical for CPC recruitment ads. Your promotion costs will never exceed the total spend as outlined above. Please note: For best results and increased ROI, we recommend running your promotion for at least 30 days.
![]()
Stop or Restart a Promotion
No need to phone a friend here at Monster. All your management tools are built into the Monster+ experience, so you can make adjustments anytime you see fit.
To stop a promotion:
- Go to the Jobs page of your Monster+ account.
- Find the Open job you wish to cancel and click on the Status dropdown menu.
- Select Closed to end the promotion and remove it from Monster. Keep in mind that any charges accrued before the promotion was stopped will be settled at the end of your billing cycle.
The closed job will remain on your Jobs page so you can easily promote it in the future.
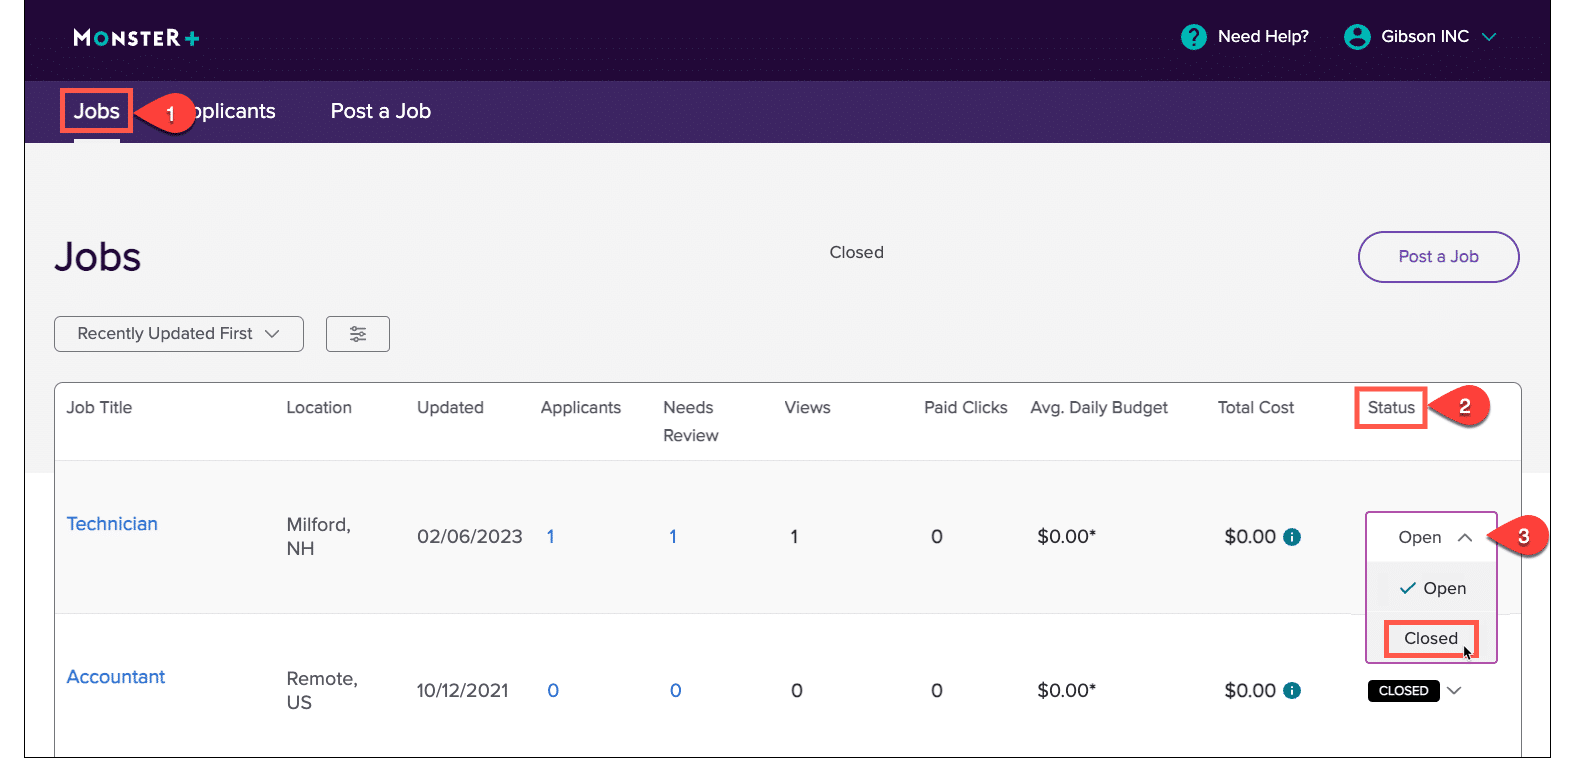
To restart a promotion:
- Similar to the steps above, go to the Jobs page of your Monster+ account.
- Find the Closed job you wish to promote and click on the Status.
- Select Open from the menu and you will be directed to the Choose a Budget page where you can select your promotion parameters.
Once you’ve confirmed your budget, Monster will get to work – distributing your job to Monster’s website, mobile app and extensive partner network.
Promotion FAQs
Back to top![]()
Monster Credits
Monster+ Pro Plan subscribers receive a monthly installment of Monster Credits that can be used within the Monster+ experience, in two ways:
1. Promote Jobs: Apply Monster Credits to your job ad promotion budget for increased visibility.
2. Search Resumes: Apply Monster Credits to chargeable candidate actions (i.e., emailing a candidate or viewing a resume)
The balance is always in clear view right at the top of the page. We’ll even keep tabs on how it’s spent, so you’ll have complete visibility. Just know this number may not reflect credits spent with the last 30 minutes, so give it some time to refresh for an official read.
-

Please Note: After your Monster Credits have been depleted, there will not be an interruption in service and any chargeable actions (i.e., current job ad promotions or resume views) will be tracked and applied to your next billing statement. You will know when you are accruing additional charges if the credit balance is showing a negative number (i.e., -30).

![]()
Monster+ Invoices
If you received an invoice or were charged, it is because a promotion was active at some point within your 30-day billing cycle. The dates of your active promotions are clearly stated on your invoice. To review your invoices, follow these steps:
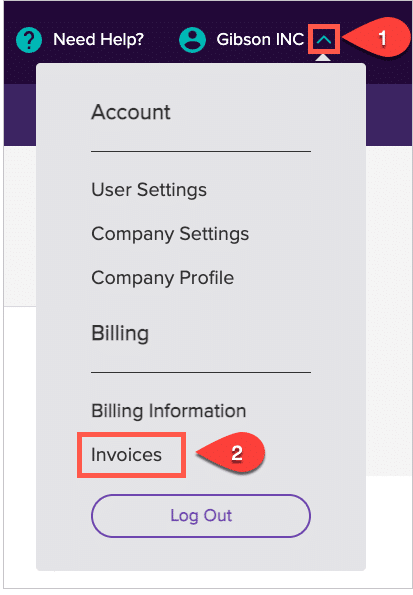
- Sign in to Monster+ and click on the dropdown menu next to your account name.
- Select Invoices to view all of the invoices you’ve received to date.
Invoice FAQs
Back to topYou will be charged for promotions that were active during your 30-day billing cycle. Check the dates of your active promotions on your invoice. To review your invoices, follow these steps:
- Sign in to Monster+ and click on the dropdown menu next to your account name.
- Select Invoices to view all of the invoices you’ve received to date.

Please note the date of your billing cycle. The promotion charges are outlined and dated to show what was accrued during that cycle.
If you believe you were charged in error or have questions, reach out to customer service or our Credit & Collections department:
Credit & Collections
Monster Worldwide, Inc
MonsterInvoiceNA@monster.com
Tel: 888-506-6543
For your convenience, Monster will email your invoice to you on the day your payment is processed. Invoices are also stored in your Monster account. To review your invoices, follow these steps:
- Sign in to Monster+ and click on the dropdown menu next to your account name.
- Select Invoices to view all of the invoices you’ve received to date.

Please note the date of your billing cycle. The promotion charges are outlined and dated to show what was accrued during that cycle.
![]()
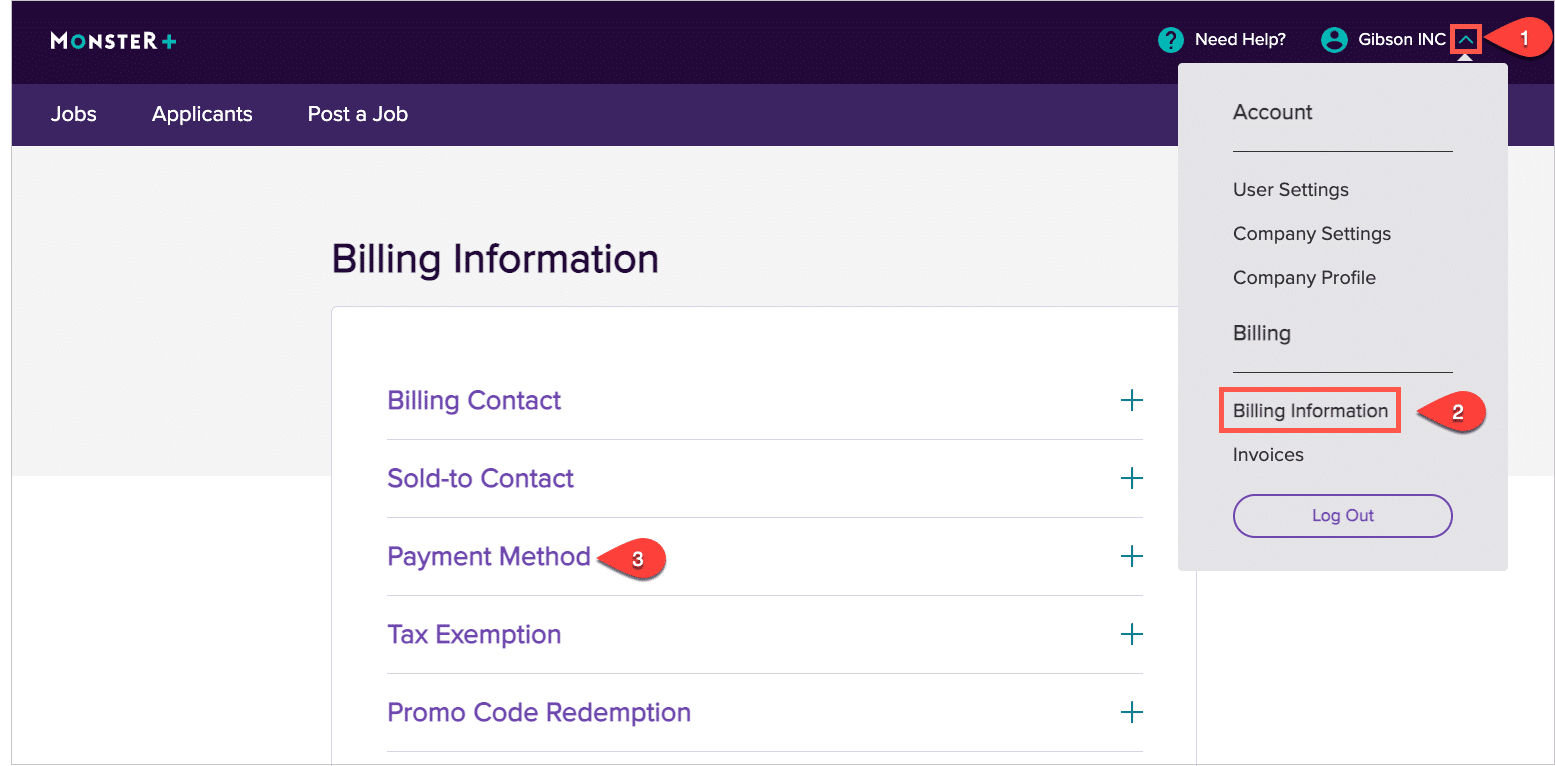
Update Payment
You can update your payment and billing details right from your Monster+ account. Just follow the steps below:
- Sign in to Monster+ and click on the dropdown menu next to your account name.
- Select Billing Information from the list.
- Click on Payment Method to expand the options available to you and make any payment updates.

Payment FAQs
Back to topWhen you’re ready to put a special offer to good use, sign in to Monster+, or create a new account. Then, follow the steps below:
- Open the menu next to your account name (top right).
- Select Billing Information.
- Expand Promo Code Redemption to enter your code, then click Apply.
The promotional offer, discount, or credit will be applied to your account and available for use immediately. Just know that Monster+ promotional codes do expire, so make note of the offer details and take advantage of the savings as soon as possible. 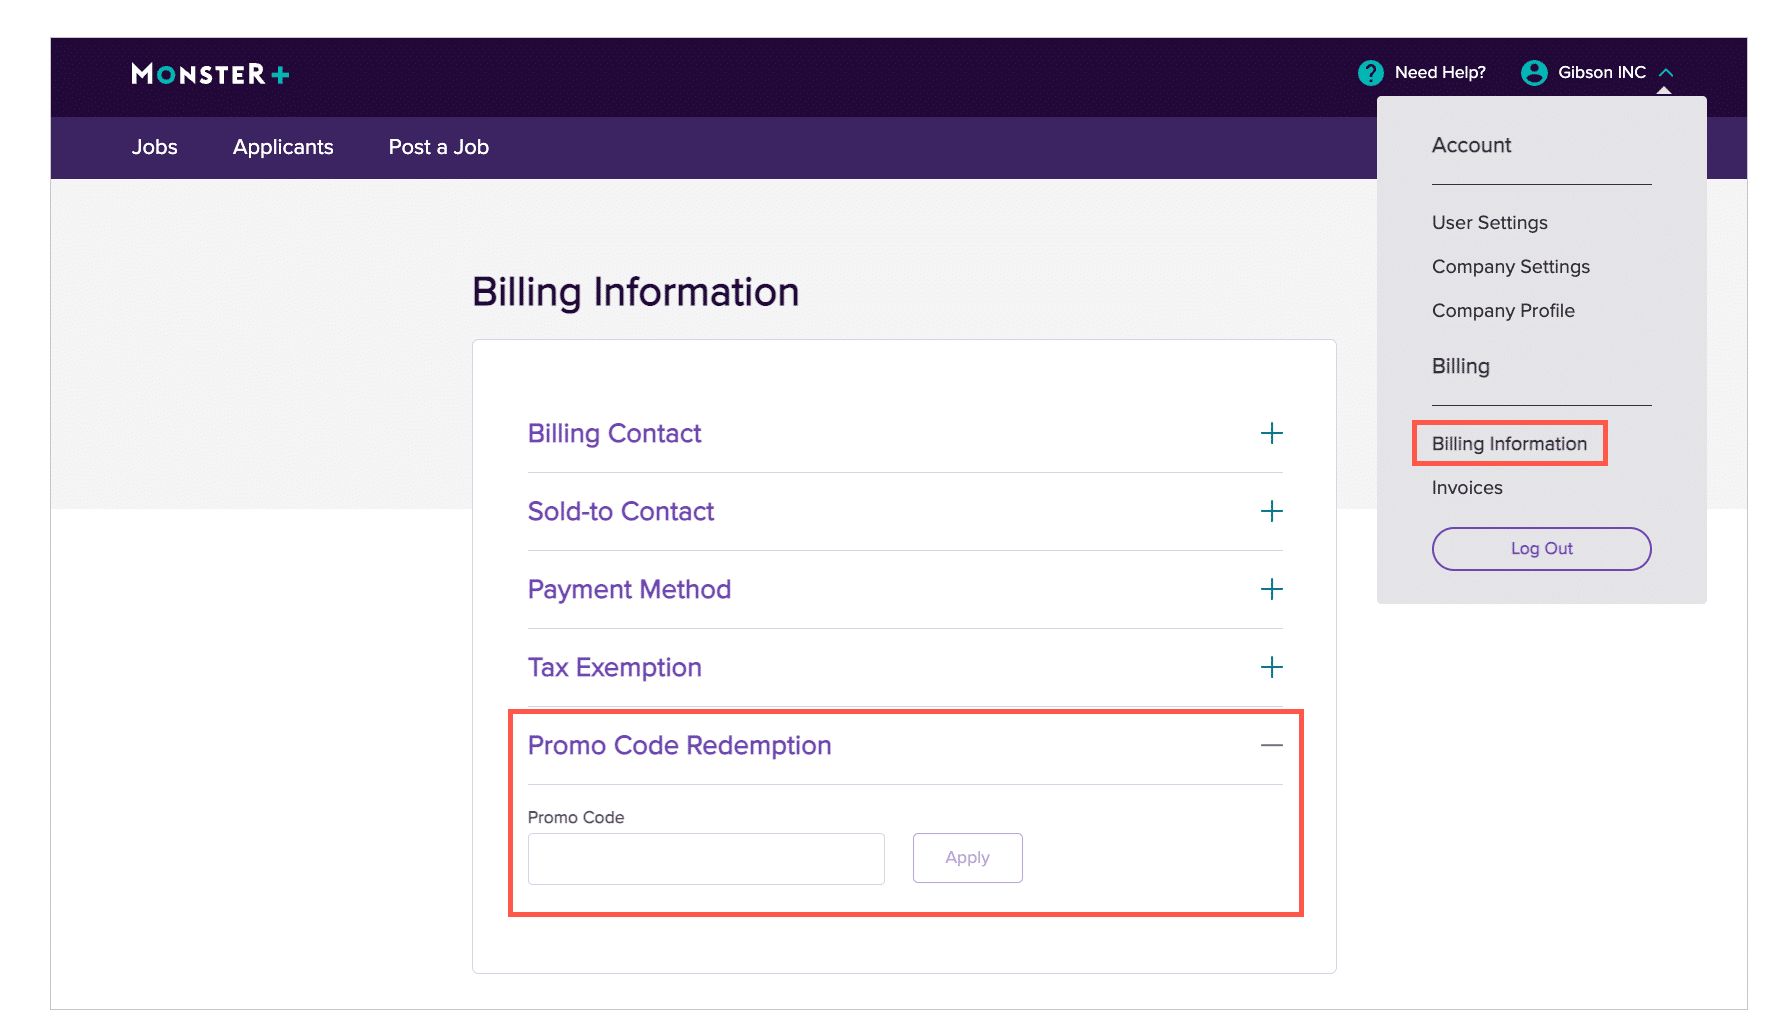
If you need to change the payment method or billing information associated with your Monster+ account, it’s a quick and easy process.
- Sign in to Monster+ and click on the dropdown menu next to your account name.
- Select Billing Information from the list.
- Click on Payment Method to expand the options available to you and make any payment updates.