Monster+ FAQs
Monster’s newest job posting platform has arrived! Although the new, user-friendly experience is extremely intuitive, you might come across some questions from time to time. This is where you will find all of the answers when it comes to posting jobs, promoting them, and managing your Monster+ account.
Posting Jobs
As you walk through the job ad process, red asterisks will indicate required fields. Just know that Monster urges all employers to complete as many fields as possible when posting their job ads for improved search rankings.
You can select the Daily Average Budget that works best for your hiring need. A higher budget will give your jobs more exposure and is recommended for hard-to-fill or urgent positions. To help determine your budget, you’ll see daily and weekly pricing estimates, as well as an estimate of how many applications you may receive over the promotion duration.
It’s all about relevance! Read the Elements of Performance article to learn how you can get better results.
Yes! When you reach the Finalize page, you will see the option to add a video about this job or your company. As long as your video is uploaded to Vimeo or YouTube, simply provide the link in the space provided and it will be included in your job ad. To learn more about recruitment videos, click here.
Your Pro plan subscription includes a set amount of Monster Credits each month which are automatically put toward any job promotions you set up. If your promotions continue after your Monster Credits are depleted for the month, we’ll apply any additional credits used to the card on file – which is why you are asked to confirm your billing information during a new job promotion setup.
The skills are aggregated from the keywords in your job description and standardized to offer candidates a quick way to determine their fit for your role. Skills in common are also highlighted for signed-in users, allowing them to easily identify jobs that match their skillset.
This feature aims to help candidates pinpoint more right-fit roles while delivering more relevant applies to employers.
For best results, Monster recommends including relevant keywords that describe desired skills within your job description text.
Candidates search on Monster for job titles, skills, or keywords within a particular location. If your job ad is considered relevant to the search, it will be presented in the list of results. A lot of factors are considered when the system ranks job ads. Read our Elements of Performance article to learn how to optimize your job ad and improve your position in search results.
By law, employers in New York City (Manhattan, Bronx, Brooklyn, Queens, and Staten Island) are required to disclose salary in their job postings. When setting up your job, if you see the message “Good faith salary range is required by local law,” you must provide a salary range to move forward.
Outside of NYC, the laws on salary transparency vary depending on your state/province, company size, and job type. Although Monster recommends including salary information for all postings, it is up to each employer to determine what compliance looks like for them. Employers should reach out to legal counsel to review requirements for their company.
Stay informed with our Pay Transparency & Salary Disclosure resource and see how employers are benefiting from new regulations.
Managing Jobs
Back to topYou can now manage your jobs and promotions at any time – right from your Monster+ account. If you’d like to stop a promotion, follow these steps:
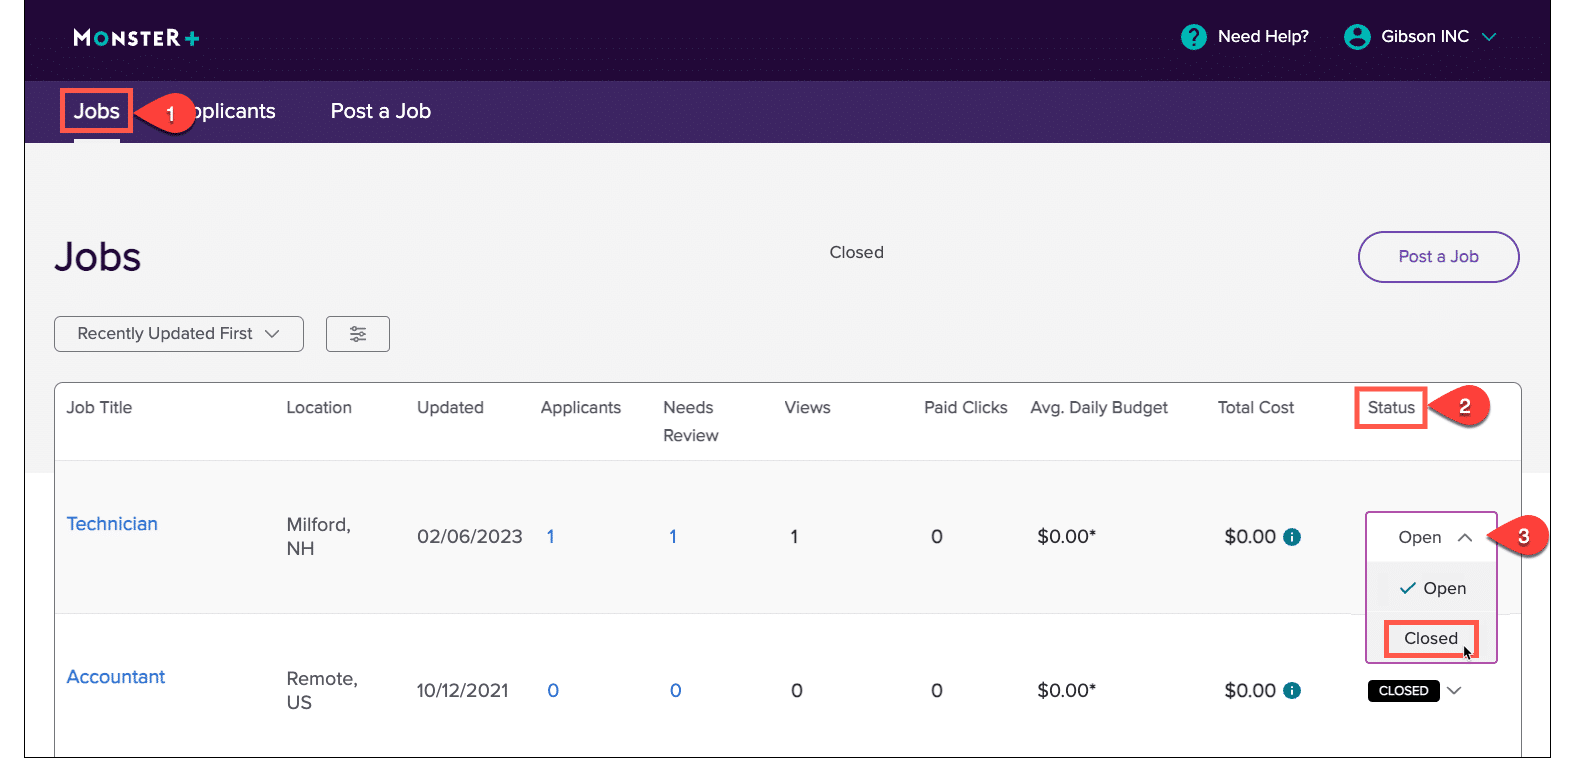
- Go to the Jobs page of your Monster+ account.
- Click on the Status dropdown menu.
- Select Closed to end the promotion and remove it from Monster. Keep in mind that any charges accrued before the promotion was stopped will be settled at the end of your billing cycle.
If you’d like to promote that same job in the future, it will remain on your Jobs page. Simply change the Status to Open when you’re ready to continue the search.
Please note that these are independent actions: Closing a job will not cancel your subscription, and canceling your subscription will not close your jobs.
Monster+ gives you all the tools you need to view, edit, expire and renew your listings effortlessly. Log in to your account and click on Job postings at the top of the page to view a list of all your job postings. It is from this page that you will be able to act on your previously published advertisements and access your candidates.
In this article we'll go over everything you need to know to effectively manage your Monster+ ads.
If you change a job posting’s Status from Open to Closed, it will be removed from the Monster site and any promotions associated with it will come to an end as well.
After you’ve signed in, click on Jobs at the top of page. Find the job ad you want to adjust and select an option from the Status dropdown menu.
- You can repost a closed job by clicking Open.
- To close a job and remove it from search results, change the status from Open to Closed.
Review our job posting actions to learn more.
Absolutely! When you log into your Monster Account, click on Jobs at the top of the page and find the job ad you want to edit. Click on the Actions menu right below the job title and choose Edit. This will take you back to the posting flow, where you can update the information of the open position.
For more information on job ad actions, click here.
Of course! You wouldn’t want to reinvent the wheel every time you need to post the same job. The Jobs page, located in the top navigation, will bring you to a list of all the jobs you have created with Monster.
To repost a closed job ad, simply change the Status from Closed to Open and it will reappear in search results. Feel free to edit the job through the Actions menu to make any adjustments. For more details on accessing the Jobs page and managing your job ads, click here.
Additionally, when you are in the process of creating a job ad you can save your progress and continue at another time by clicking Save for Later at the bottom of the page. The draft will be saved to your Jobs page.
We have detailed reporting available so you can always understand the value you’re getting with Monster and your return on investment. When signed in to your Monster Account, click on Jobs at the top of the page. Each job ad you’ve created will be listed in this view. Click the job ad title to view the performance data such as: Views, Paid Clicks, Applications, and Total Cost. To learn more about monitoring your performance, click here.
Promoting Jobs
Back to topIf you change a job posting’s Status from Open to Closed, it will be removed from the Monster site and any promotions associated with it will come to an end as well.
Go to your Jobs page and click on the title of you Job Posting. You will see a pop-up window appear with your performance data as well as your current promotion details.
You choose your budget and only pay when a candidate clicks, taps or swipes to view your job ad, or clicks on the apply button. Change your budget or cancel at any time. For more details, check out our Promoting Your Monster Job Ads article. It’s a great read.
After entering all the job details and reviewing them in the Finalize step, you can continue to the next page, where you can specify a budget, which is the average amount you’d like to spend per day to promote your job.
Simply pick from the options available. To help you decide how much to spend, you’ll see daily and weekly pricing estimates and an expectation of how many applications you may receive over the promotion duration.
Just remember you will be billed based on Cost Per Click (CPC), which means you are only charged when a candidate clicks, taps, or swipes to view your job ad or when they click on the Apply button.
For more details, check out our article Promoting Your Monster Job Ads.
When you go to your Jobs page, you will see a complete list of all of the job ads you have created. Closed or Expired jobs will have $0 in the Avg. Daily Budget column. If you want to promote one of your closed or expired jobs, click on the Status dropdown menu and select Open to make it visible on Monster. Then you will be able to promote the job.
Read our article, Manage Your Monster Job Postings to learn more.
Managing Applicants
Back to topWhen you sign into your Monster Account, click on Applicants at the top of the page. This will bring you to a list of applicants that have applied to any of your job ads. Feel free to use the filters and sorting tools to better manage your list, mark applicants as favorite, indicate your interest level, and set a status to keep track of their progress through the hiring cycle. You can also contact an applicant from this view. To learn more, review our article on Applicant Management.
Resume Search
Back to topAs many as you want! You can even save some of your searches for easy access in the future. Keep in mind that you can save up to 10 searches with Classic Resume Search. You can view and manage your saved searches from the top of the page via the My Candidates menu.
Yes! You can save your search and receive an email notification when new candidate matches are found. It’s easy! On the left side of your search results page, click “Save search” under your criteria and follow the onscreen prompts to complete your set up.
Yes! At the top of your results page, you will see a “Sort By” dropdown menu. Select “Resume Updated” in Descending order and click “Go” to refresh your results with the most current resumes at the top of the page. Just remember that candidates who haven’t updated their resumes recently may still be open to your opportunity.
Yes, you can block resumes in two ways. You can select the resume (or resumes) as part of a search results listing and choose Block Resume from the Action drop-down menu. Alternately, you can click the Block Resume link when viewing an individual resume. When you block a resume it will be noted as blocked in search results and will be omitted from Saved Search results.
If I block a resume, will that resume be deleted?
No. The resume will still remain in our resume database. If a blocked resume is found in your future resume searches, it will be noted with a blocked icon to save you from selecting and viewing the resume again. Also, blocked resumes are not included in your Saved Search email results.
Can I un-block a resume?
Yes. If a blocked resume is returned in your search results, you can click the Un-block link to change the resume’s status.
How many resumes can I block?
You can block up to 1,000 resumes. This is a rolling cap. When resume 1,001 is blocked, the first resume will be automatically un-blocked.
Monster Credits
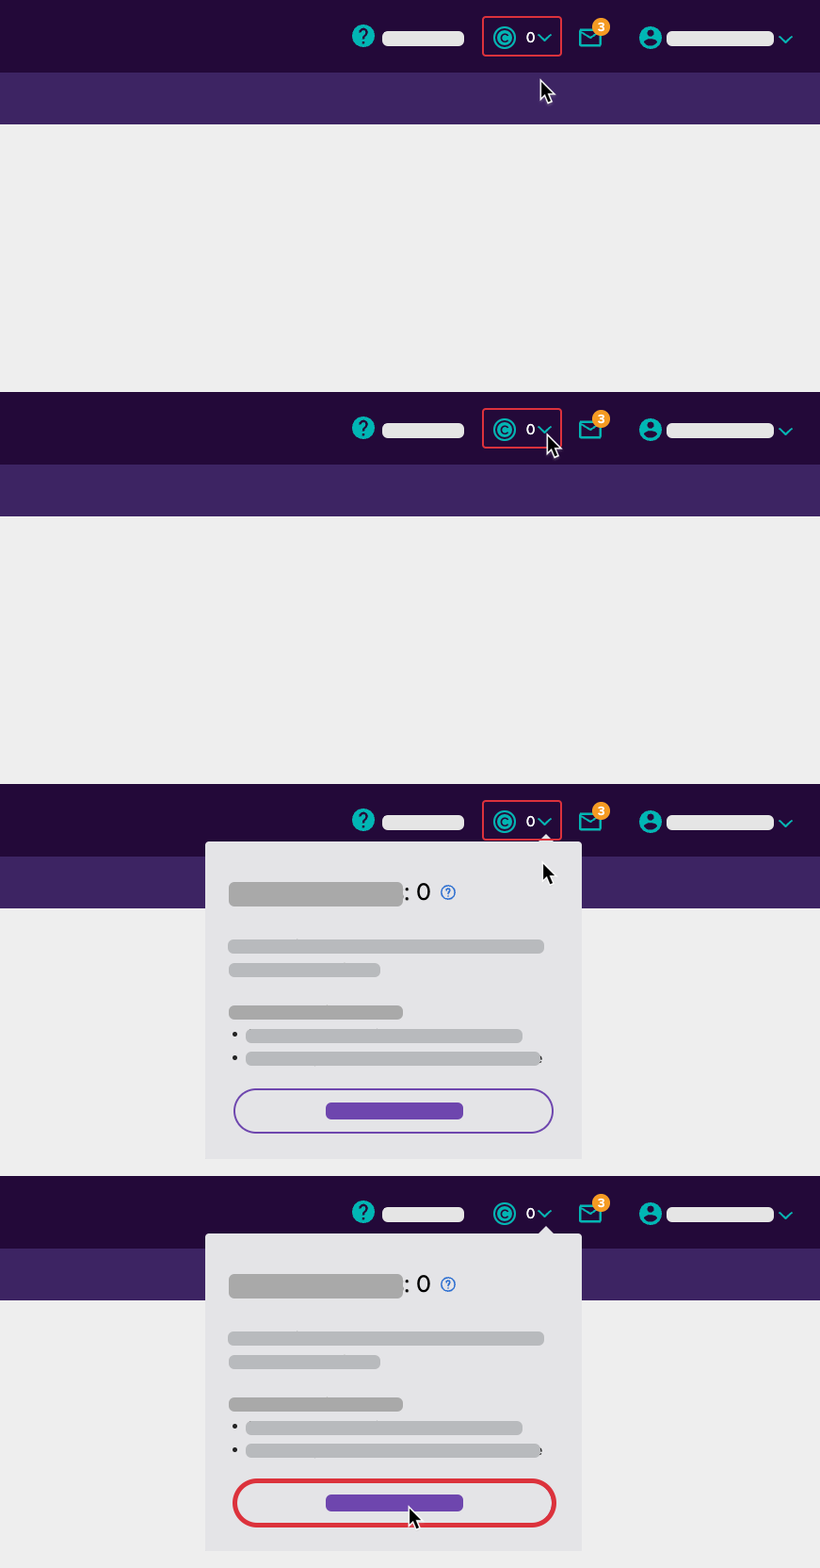
Back to topIf you do not want to go beyond the monthly allotment of credits, keep an eye on your credit balance. It’s always prominently displayed in the top navigation when signed in to Monster+. We’ll also send you an email notification when your Credit balance is low so you can make any adjustments to your current promotions or resume search usage.
Since 1 Monster Credit = $1, you can expect to use the same number of credits as the promotion prices you select. When it comes to Resume Search, each chargeable candidate action will deduct 2 Monster Credit.
You need to have a Monster+ Pro subscription to receive an allotment of Monster Credits each month. Log into Monster+ and click on the credit icon at the top of the page to learn more. Then, click the Upgrade button to purchase the Pro plan.
When signed in to Monster+, your Monster Credit balance is prominently featured at the top of the page. Click on it to view your spending history. This number refreshes about every 30 minutes, so it should be a great reference point when considering budget and usage.

Negative balances are ok – it’s just how we track billable actions once you’ve depleted the credits included in your monthly subscription. When this occurs, billable actions (i.e., setting promotion budgets or emailing candidates), are tallied in the negative to represent the balance that will be applied to your next billing statement.
You won’t need to! To make it easy and convenient, Monster+ Pro customers can surpass their credit balance without interruption. Monster will just track any overages and apply them to the payment method we have on file.
Credits must be used by the end of the billing cycle or they will be forfeited. To make use of your credits during a recruitment slowdown, we recommend proactively using Resume Search to identify future frontrunners and improve your candidate pipeline.
No need to worry. If you exceed your credit balance for the billing cycle. Monster will just track any overages and apply them to your next bill.
Just know that after your Monster Credits have been depleted, there will not be an interruption in service and any chargeable actions (i.e., current job ad promotions or resume views) will be tracked and applied to your next billing statement. You will know when you are accruing additional charges if the credit balance is showing a negative number (i.e., -30).
Your Monster+ Pro plan includes Monster Credits that can be used in two ways:
Promote Jobs: Apply Monster Credits to your job ad promotion budget.
Search Resumes: Apply Monster Credits to chargeable candidate actions (i.e., emailing a candidate or viewing a resume)
Monster Credits are included as part of your monthly Monster+ Pro Plan. They are applied to your selected daily average budget and can be used to proactively search and contact candidates in our resume database.
Billing/Payment
Back to topIt depends on your plan:
- If you have an Annual Plan with Monster+, contact your Sales Representative for assistance.
- Monster+ Standard Plan Customers: To stop further charges, simply close your job(s).
- Monthly Monster+ Pro Plan Subscribers: To stop further charges, you must do two things:
- Cancel your monthly subscription.
- Close your jobs.


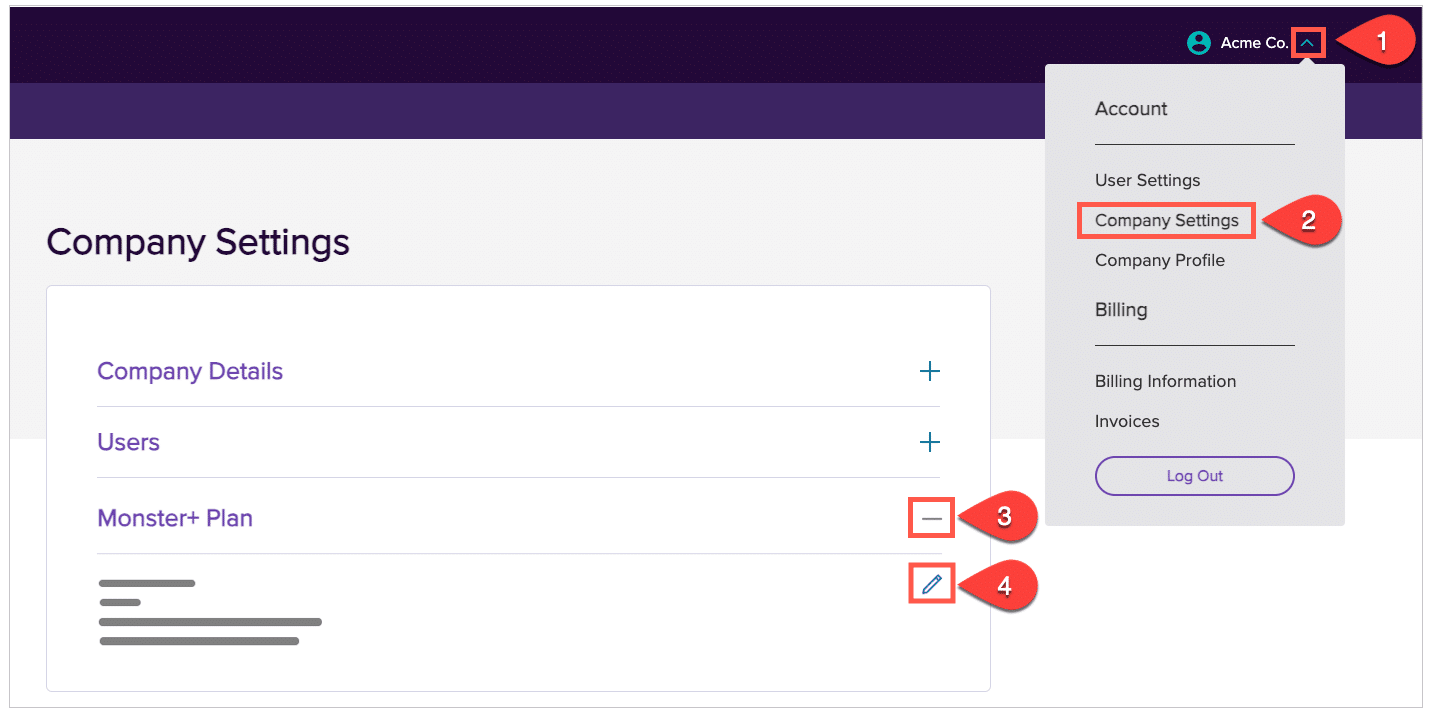
To cancel your Monthly Pro Plan monthly subscription:
- Select Company Settings from the Account menu at the top of the page.
- Click to expand the “Monster+ Plan” to review your current enrollment.
- Click the pencil icon and select the pay-as-you-go Standard Plan.
You will have access to your Pro Plan features until the end of the current billing cycle. Just know that once you downgrade you will no longer have access to Monster’s Resume Search and additional users will no longer have access to your account.
To close a job:
- Go to your Jobs page and review the status column.
- Click the dropdown menu and change the status of the job from Open to Closed.
Once your jobs are closed or expired, you will not receive any charges from that point forward. When the billing cycle ends, you will receive an invoice for charges accrued while your jobs were open.

Are you a traditional Monster subscriber looking to cancel? Click here.
Absolutely! To ensure your job promotions run smoothly without interruption, Monster will safely and securely perform a one-time authentication on a new payment method once you initiate the first transaction. This process applies only to customers in the Standard Plan, due to its unique, pay-as-you-go billing structure.
Here's how it works:
Running a job promotion with a new payment method will prompt a one-time, $10 authentication charge – immediately returned to you in the form of Monster Credits. As your job promotion gains clicks and applies, your Monster Credits will be consumed first, and the remaining balance will be charged to the newly verified payment method. Just know that the Monster Credits will expire after 30 days.
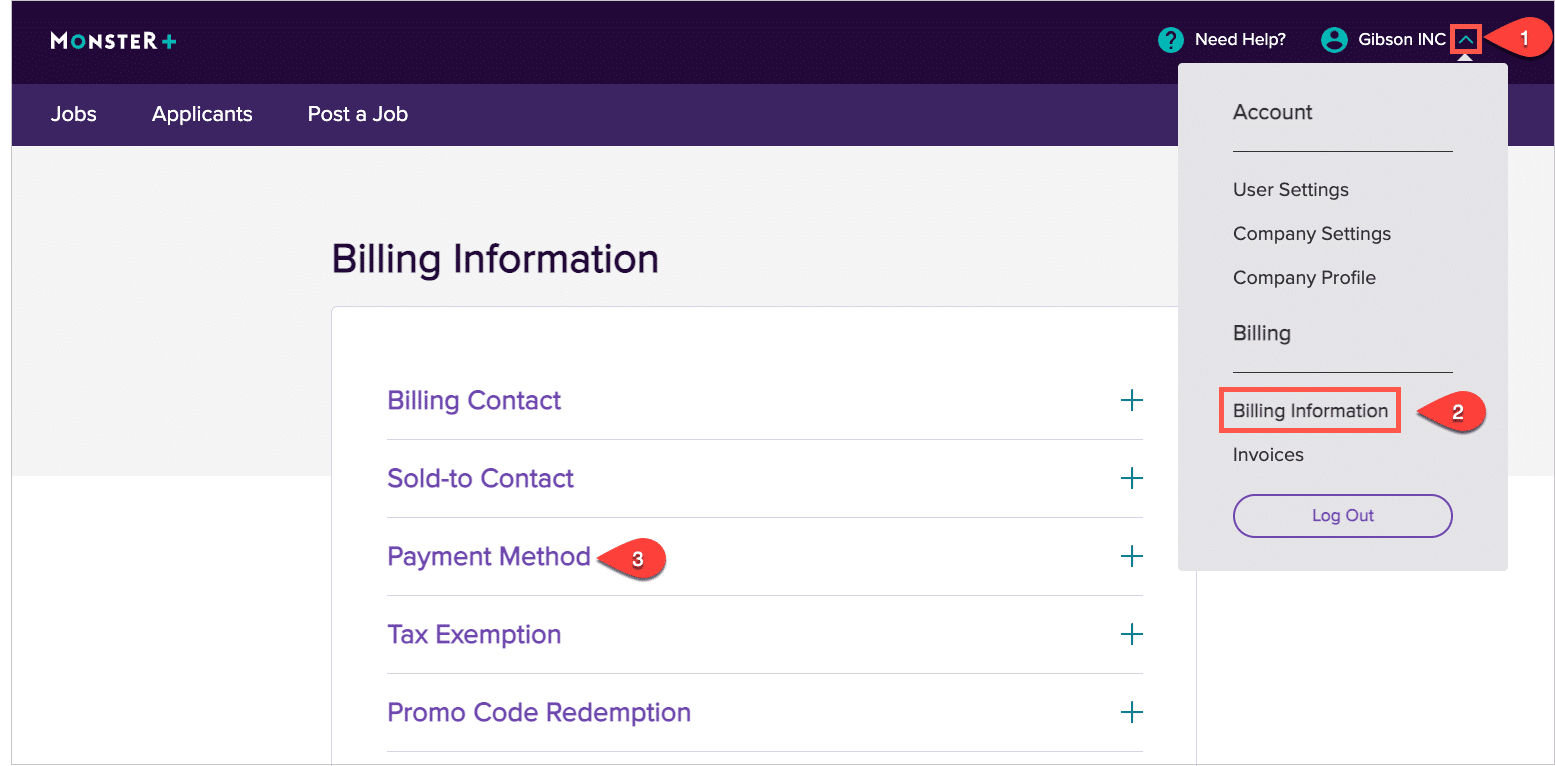
If you need to change the payment method or billing information associated with your Monster+ account, it’s a quick and easy process.
- Sign in to Monster+ and click on the dropdown menu next to your account name.
- Select Billing Information from the list.
- Click on Payment Method to expand the options available to you and make any payment updates.
Your Daily Average Budget is, in fact, an average. The actual budget utilized each day is expected to fluctuate over the course of the promotion’s duration (e.g., one month), due to views, clicks, and applies, as well as distribution efforts to maximize your job ad’s visibility.
Just know you will never be charged beyond the total spend you indicate through your promotion selections (plus tax). This is calculated by multiplying the Daily Average Budget by the number of days you want the promotion to run.
($12 Daily Avg. Budget) x (30 Day Promotion) = $360 Total Spend
When you’re ready to put a special offer to good use, sign in to Monster+, or create a new account. Then, follow the steps below:
- Open the menu next to your account name (top right).
- Select Billing Information.
- Expand Promo Code Redemption to enter your code, then click Apply.
The promotional offer, discount, or credit will be applied to your account and available for use immediately. Just know that Monster+ promotional codes do expire, so make note of the offer details and take advantage of the savings as soon as possible. 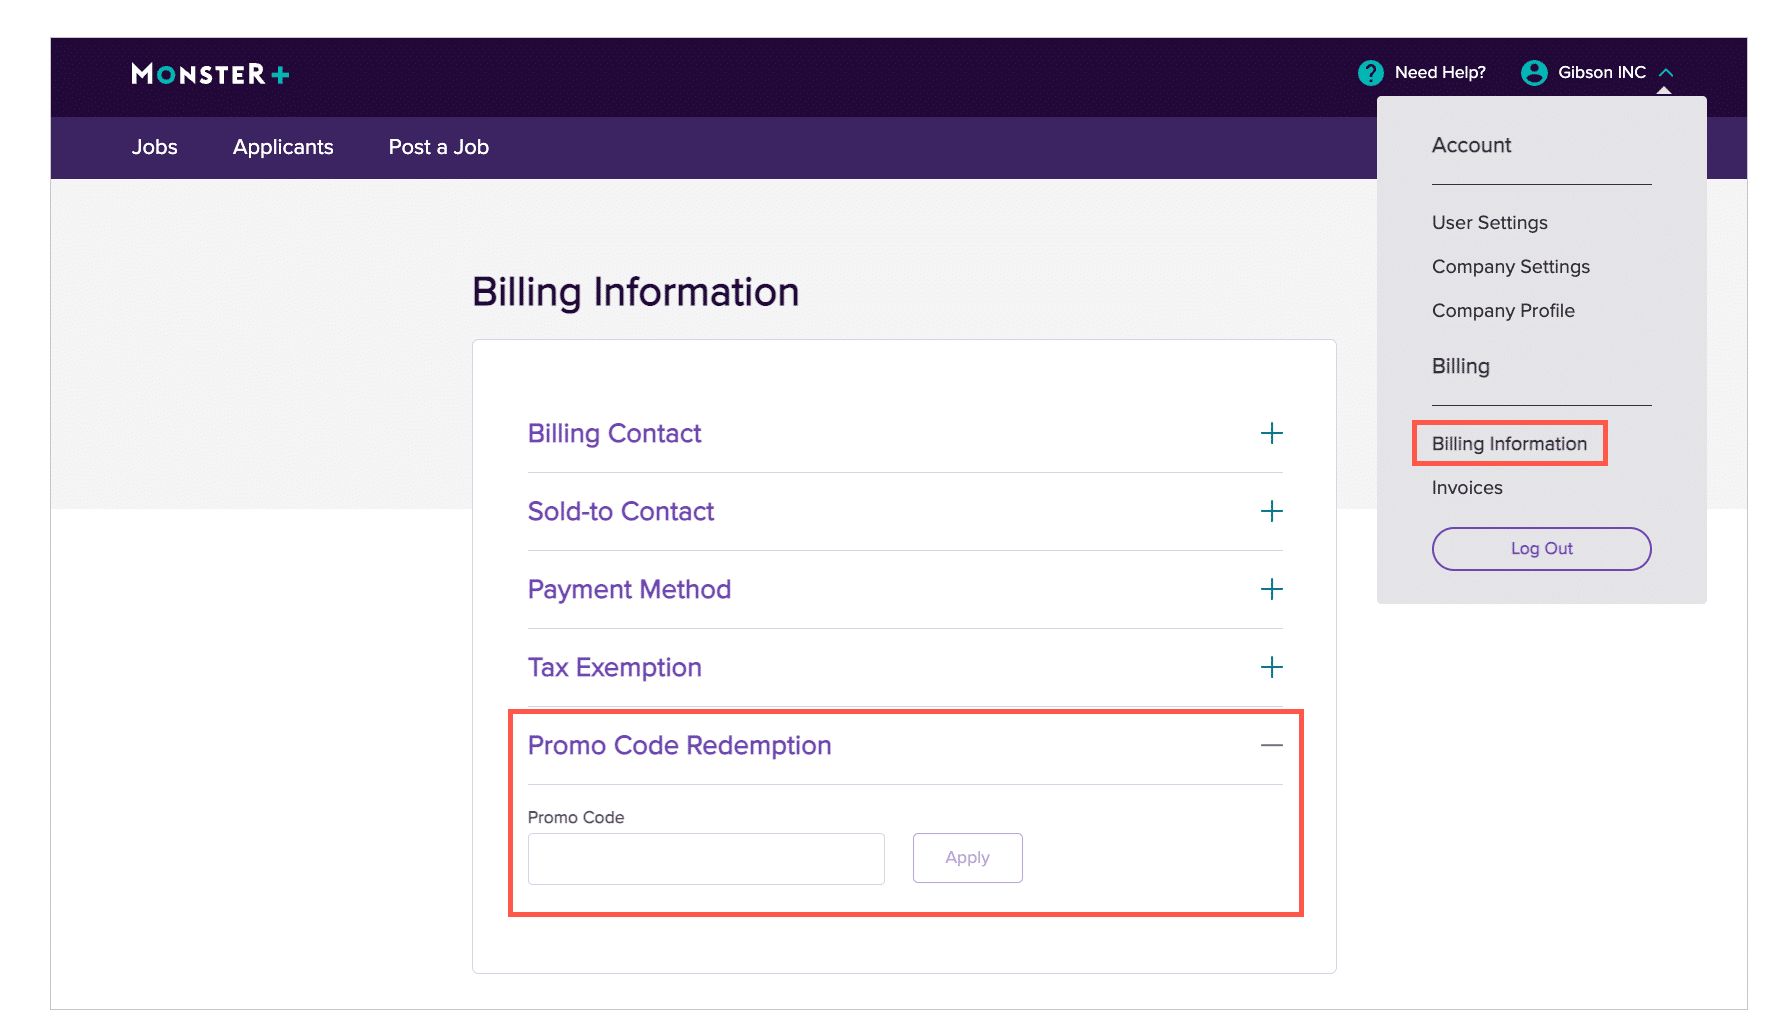
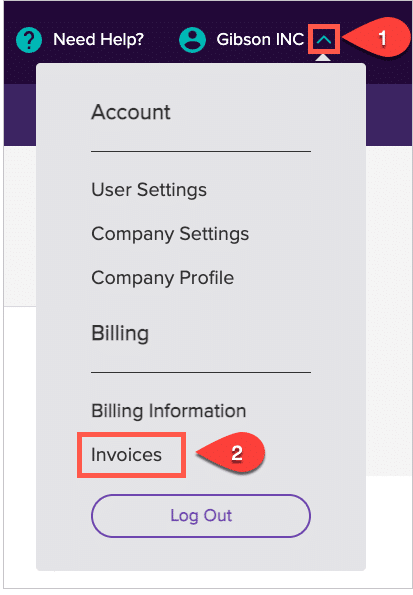
You will be charged for promotions that were active during your 30-day billing cycle. Check the dates of your active promotions on your invoice. To review your invoices, follow these steps:
- Sign in to Monster+ and click on the dropdown menu next to your account name.
- Select Invoices to view all of the invoices you’ve received to date.
Please note the date of your billing cycle. The promotion charges are outlined and dated to show what was accrued during that cycle.
If you believe you were charged in error or have questions, reach out to customer service or our Credit & Collections department:
Credit & Collections
Monster Worldwide, Inc
MonsterInvoiceNA@monster.com
Tel: 888-506-6543
Your billing cycle end date is the date your payment is processed, which is stated on your invoice. The start date of your billing cycle would be that same day. To view your invoices, click on the user icon at the top of the page and then select Invoices in the dropdown menu.
Standard Plan customers are charged at the end of a 30-day billing cycle.
- The billing cycle begins on the date the first promotion is launched, with the exception of former Pro Plan customers who retain their original bill date.
- Any views/applies accrued within that 30-day billing period will be itemized in the invoice at the end of the billing cycle.
- Charges will be issued before the bill date if the account balance has reached the maximum threshold of £500.
- To confirm payment authenticity, a one-time, £10 charge will occur when initiating the first promotion. The funds are then returned in the form of Monster Credits.
Monthly Pro Plan customers are charged at the beginning of their 30-day billing cycle.
- The billing cycle begins on the date the subscription was purchased.
- Any Monster Credit overages will be charged on the first upcoming bill cycle day.
- Charges will be issued before the bill date if the account balance exceeds twice the cost of the monthly subscription.
- Note: If upgrading from the Standard plan to the Pro Plan, the bill cycle day will align with the day it goes into effect.
If you have an annual plan, please refer to your contract for your billing details.
You can find your Billing Information in the user icon dropdown menu. On the Billing Information page you can confirm and edit your billing contact information, stored payment information, as well as your tax information and exemption status.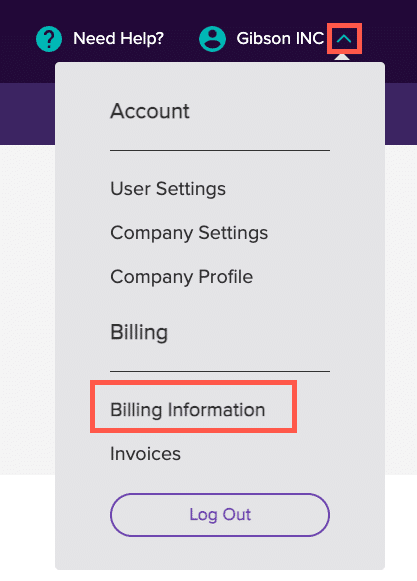
For your convenience, Monster will email your invoice to you on the day your payment is processed. Invoices are also stored in your Monster account. To review your invoices, follow these steps:
- Sign in to Monster+ and click on the dropdown menu next to your account name.
- Select Invoices to view all of the invoices you’ve received to date.
Please note the date of your billing cycle. The promotion charges are outlined and dated to show what was accrued during that cycle.
The payment information that you enter is safe and will remain protected by Monster’s PCI-compliant payment processor. It will only be utilized for your active and future job ad promotions.
Currently, you can choose to enter a Direct Debit or Credit Card. In the future, PayPal will also be a payment option.
When you promote you first job ad, we will ask you to set up your preferred payment method. You will be charged initially when your campaign balance due has reached $25. From that point, you will be charged either on a 30-day billing cycle or when the account balance exceeds $500.
During the checkout process, after you enter your payment information, you will be asked if your company is tax exempt. If so, you will need to enter you Government-approved Tax Exemption ID, type, and upload a document of proof. If you don’t have your tax exemption information handy at checkout, you can skip the step and add this information later in the Billing Information page within your Account menu. Just click on Tax Exemption to expand the section and edit your information.
My Account
Back to topYou can invite all of your users after the initial setup. First, create your Monster+ account. The account originator defaults to the Owner role. As an owner, you can add as many users as you’d like from the Company Settings page. For more details, click here.
If you have the Monster+ Pro Plan, click on the user icon at the top of the page and select Company Settings. Expand the User menu to Add a User, Edit, and Delete. For more details, click here.
If you have more than one Monster+ account, click on the user icon at the top of the page and select User Settings. Here you will need to expand the Accounts section to view your options and make the switch. For more details, click here.
Existing Monster+ customers can upgrade to the Pro Plan through their company settings. Just follow these steps:
- Sign in to Monster+ and click on your account name at the top of the page.
- Select Company Settings from the menu.
- Select “Monster+ Plan” to review your current enrollment.
- Click the pencil icon to get a detailed view of Monster+ Plans and choose the one that works best for you.
Yes, you can change your plan anytime. Just follow these steps.
- Sign in to Monster+ and click on your account name at the top of the page.
- Select Company Settings from the menu.
- Select “Monster+ Plan” to review your current enrollment.
- Click the pencil icon to get a detailed view of Monster+ Plans and choose the one that works best for you.
If you see more than one account, this means you have been invited or granted access to work within another Monster+ user’s account. To switch the account you’re working within, click the user icon at the top of the page and select User Settings. Open the Accounts section to view your options and make the switch. For more details, click here.
Click on the user icon at the top of the page and select Company Settings. Expand the User menu and click the edit icon next to the user to whom you wish to transfer ownership. Choose Owner from the access level options when prompted and then confirm your selection.
Adding a user simply provides them access to your company’s Monster+ resources. If you choose to remove the user, they will no longer have access to those resources, but this will not impact their Monster+ account standing in any other way.
If you are an employer and would like to delete your Monster Account, please contact your Monster Representative for assistance, or contact us.
If you are a job seeker, you will need to access our Job Seeker Help Center for additional information on deleting your Monster account.
To submit a Personal Data Request, please click on the following link to complete submission of your request: Personal Data Request. Upon submission, Monster will process pursuant to applicable law.
For more information about how Monster collects, stores, uses and shares personal information, please review our privacy notice by clicking here, selecting your region, and clicking on “Privacy Center”.
The information in this section is important as it can incorporate your employer brand messaging and help you position your company as an employer of choice. You can also feature your logo and a video to help candidates recognize your company culture, work environment and everything you have to offer.
Where will candidates see my Company Profile?
Your Company Profile will be automatically attached to the bottom of all of your job ads for your convenience.
Can I create one Company profile for all of my recruiters to use?
At this time, each user has their own individual account and company profiles cannot be shared across accounts. We recommend sharing the description and any logo and video assets with your team to implement on their own.
The company profile information can be entered when posting a job ad as well. While you are on the Finalize page of your job ad, anything you include in the About the Company section can be saved to your Company profile just by checking the box available at the bottom of the page.
When you are working in your Monster+ account there are a few settings and tools you’ll want to manage. When you sign into Monster, click on the menu on the top right to access everything associated with your account.
You can update your contact information and payment options, access invoices and tax information, and create your company profile with a logo, a video and more.
Read our Monster Account Administrative Tools article to learn about all settings.
To access your Company Profile, click on the user icon at the top of the page and then click Company Profile in the dropdown menu. You will be brought to a page where you can edit all of the elements of your company profile. Frequently asked questions:
What is a Company Profile and why should I create it?
The information in this section is important as it can incorporate your employer brand messaging and help you position your company as an employer of choice. You can also feature your logo and a video to help candidates recognize your company culture, work environment and everything you have to offer.
Where will candidates see my Company Profile?
Your Company Profile will be automatically attached to the bottom of all of your job ads for your convenience.
Can I create one Company profile for all of my recruiters to use?
At this time, each user has their own individual account and company profiles cannot be shared across accounts. We recommend sharing the description and any logo and video assets with your team to implement on their own.
The company profile information can be entered when posting a job ad as well. While you are on the Finalize page of your job ad, anything you include in the About the Company section can be saved to your Company profile just by checking the box available at the bottom of the page.
Please make sure you go to https://hiring.monster.com to log in. If you are still having trouble signing in, there could be 3 reasons for this:
1. Accessing the wrong platform for your employer account.Make sure you are using the correct link to access your account. There are two different platforms to consider:
- Monstercustomers sign in here: https://hiring.monster.com/SignIn.aspx
(Post duration jobs (30 or 60 days) and/or use SearchMonster to find candidates.) - Monster+customers sign in here: https://manage.monster.com/en-us
(Choose a budget for every job and/or search for candidates using Monster Credits.) - Have you entered our Candidate experience? Some employers make the mistake of trying to access their account through our candidate site. Please make sure you go to https://hiring.monster.comto log in.
2. The wrong password was entered.
If you’re in the right platform and you still can’t log in, click the forgot password link under the sign-in area, and reset instructions will be emailed to you. If you do not receive it, check your junk/spam folder and add no-reply@ses.monster.com to your safe sender list.
3. Browser issues.
Some old browsers do not function well. Make sure you are in an updated version of the following recommended browsers:
Chrome (download)
Firefox (download)
Safari (download)
If you receive an error message or the page does not load, clear your cache and cookies, reload the site, and log in again. Also, make sure you have the latest version of Java and JavaScript: http://java.com/en/download/installed.jsp
Still need help? Contact us.
The company name is located in 3 places on your account.
Job Posting Details
When posting a job, you can enter a company name which will appear on the job posting. To edit this company, follow the below steps.
- Navigate to the Jobs link located in the top navigation bar
- Locate the job company name you would like to change on the job posting.
- Under the job title is a menu for Actions. Click the Actions menu and go to Edit
- Locate the Job Title and Location section. Next to your company name, click the edit icon
- Update your company name and click continue.
- Your company name is now updated on your job posting.
- Company Profile
Company Profile
To edit the company name on your company profile, follow these steps:
- Click on your username in the top right of the page to access account settings menu
- Click Company Profile
- Add/edit your company name
Company Settings
The company name on your company settings is only used for your reference. To change this, follow these steps:
- Click on your username in the top right of the page to access account settings menu
- Click Company Settings
- Add/edit your company name
At this time, you cannot change the email address associated to your account. We are working on building this functionality in the future. Stay tuned to this article for updates in the future.
Currently you cannot access jobs posted by another user on Monster+. We are looking to build functionality in the future which will allow users from the same company to access each others jobs.
Browser Settings & Privacy
Back to topMonster is committed to protecting the privacy of our users and strives to provide a safe user experience. Our Privacy Policy can be found in the Privacy Center, which is available to help you better understand how Monster collects and uses your information and the choices you have for protecting it. Our Privacy Policy is designed to inform you of our privacy practices using language that is as clear and concise as possible.
Any of the common technical errors that occur on websites can be solved by clearing the Temporary Internet Files (Cache) and your browsing data (Cookies) within your browser. The following scenarios are often solved by clearing the cache and cookies, reopening the browser, and logging back in:
- Can’t view a page on the site.
- Page does not load.
- Page no longer exists.
- Can’t login.
- Page cannot be displayed.
- You receive an error message of any type
The following website (not powered or hosted by Monster) includes links to instructions for clearing/resetting/refreshing cache for various browsers. For additional help or information, please check your browser’s Help menu. http://www.refreshyourcache.com/en/home/
A cookie is a text file stored on your computer that we use to help make our site work. Learn more about Monster Cookies.
For additional information, visit our Monster+ Job Postings page.
