Monster

Account Login and Management

Everything you need to know in order to run your Monster account is right here – from managing your account settings, to setting up new users, and viewing reports and monitoring inventory. Have a look at the articles below to get started.

Monster

Training Topics

Looking for information on the Hiring Library? We have everything you need. Click here to get started.

Take a Tour
We’ll walk you through your Monster Dashboard so you can easily access all of your account tools.
Monster

FAQs

Account and Company Settings can be found by navigating to the Your Account menu at the
top of the screen after logging into your account.

All users have the ability to update their Account Profile and Account Preferences, while
Administrators also have the ability to update company information such as company info,
billing contact and preferences.

Account Settings
From the Account Profile tab, you can edit the following:

  • Contact Information (mailing address, email address, phone number; parts of this may
    not be editable; contact us if you need to change something)
  • Username and Password (username cannot be changed)
  • Job Ad Contact information (parts of this may not be editable; contact us if you
    need to change something)
  • Billing Contact information

From the Account Preferences tab, you can edit the following:

  • Apply Method
  • Apply Response Preferences
  • Page Display
  • Resume Search Preferences
  • Job Ad Notifications
  • Recommended Resumes Email Notifications
  • Customers do not want their Physical Address Zip Code to be displayed on their Jobs.
    Default is unchecked/no change from current where Zip Code is displayed on Job View
    when it is provided. When checked, a value will be added to jobs posted by this
    xcode.

Company Settings
From the Company Settings tab, you can edit the following:

  • Company Profile (parts of this may not be editable; contact us if you need to change
    something)
  • Billing Contact (can restrict other users to invoice only)

From the Company Preferences tab, you can edit the following:

  • Apply Method
  • Apply Response Preferences
  • Note: Administrators have the ability to set company user restricted settings here

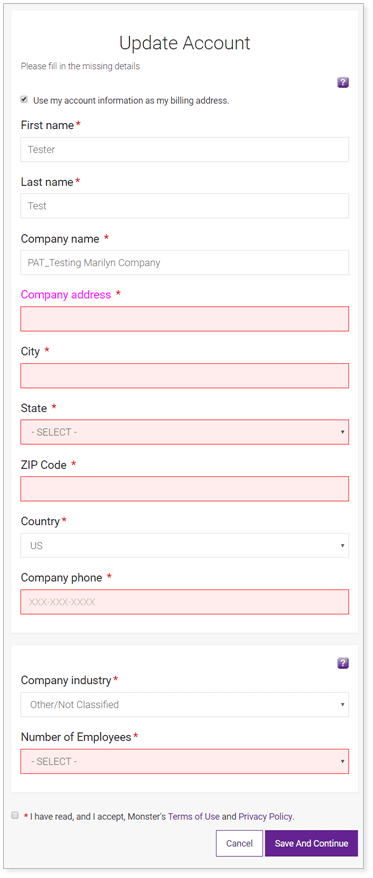
Note: During the checkout flow, if there is missing account information,
the user will be guided to an “UPDATE ACCOUNT” page that will prompt them to provide the
missing information (highlighted in red) before completing their current activity. This
may occur if the account was originally set up via the manual xcode creation process in
webadmins new company set up wizard.

If you are having difficulty logging into your account, please follow these suggestions:

Are you on the Employer website?
Employers/Recruiters should log into hiring.monster.com . If you are on just monster.com
that is the website for job seekers.

Are you using a supported browser?
Some older browsers do not function well on the Monster website. Please make sure you
are using one of our supported web browsers.

Are you receiving some sort of error message or does the page not load at all,
or gets “stuck” loading?

This can often be fixed by Clear Cache and Cookies, reloading the web page, and logging
in again. Also make sure you have the most updated versions of Java and that JavaScript
is enabled on your browser:

Did you forget your username?
You should have received an email with your Username when your Monster account was
created. If you’ve forgotten it, you can use the email address associated with your
account to log in. After you log in, you can find your username on your main Account
page.

If, however, you have more than one username associated with your email address, the
system will prompt you for that username – if you’re not sure what it is, contact us so our Customer Service Representatives can help.

Did you forget your password?
If you have selected a secret answer as part of your account profile, you will be asked
to supply this answer. An email with instructions on how to access your account will be
sent to the email address associated with your account. If you have not selected a
secret answer, you will be asked to enter your account email address. Click on the
password link at the bottom of the login box.

Enter the email address associated with your Monster account in the email address field:

An email with instructions on how to access your account will be sent to the email
address associated with your account.

Is the issue still persisting?
Please contact us and one of our Customer Service Representatives will
help you fix the issue.

You can request a new password online with the steps below:

  • Go to http://hiring.monster.com click the ‘Log In’ button. Click the ‘Forgot your password?’ link.
  • Enter your Monster account Email Address in the text box and click continue.
  • Check your inbox for an email from Monster with your unique password reset link.
  • You have been redirected to Monster. Create and confirm your new password. Choose a password that is between 8 – 20 characters that has both upper and lower case letters, and combines symbols, numbers and special characters.
  • From here you can click on the “Access your account” link and you are ready to go.

When you create a job, you’ll have an opportunity to include an auto-reply letter that will be sent to Job Seekers who apply to your job ad via Monster’s Apply Online feature. You can either select a letter from your Hiring Library or create a new letter. If you choose an existing letter, you can send it as it is, or customize if for the job ad. If you create a new letter, or update an existing letter, you can save it for future use by selecting the Save Letter to Hiring Library option.

You can also add an auto-reply letter to your job ad after your job has been created. Simply click the edit link associated with the ad on the Manage Job ads page, followed by the Auto-Reply tab. You can then choose an existing letter or create a new letter to include with your ad. You can also stop sending a letter that’s included with a ad on this page.

Letters can be viewed, edited, and created independently of a job ad by hovering over Your Account and selecting Hiring Library. Options are on the left side of the screen.

Step-by-step instructions:


If you have not written any auto-response letters yet:

1. Create a job as usual.

2. Choose Auto-Reply Letter from the “Get more out of your job ad!” section.

3. To create a letter either select New Letter and write one, or use one of the Saved Letters.

4. Click Add Letter.

5. You can click on the Home tab and the Auto-reply letter should be added to the job ad.


If you have already used an auto-response letter before:

1. Create a job ad as usual.

2. Complete the first two pages and click Continue.

3. If you wish to create a screening questionnaire, do so here. If not, click Skip.

4. To create a letter either select New Letter and write one, or use a Saved Letter.

5. Click Continue.

6. Finish the ad as usual.


SmartFields

Smart Fields allow you to create a letter that can be sent to different candidates for different jobs, but automatically include the correct content. You can select:

· Date(this will automatically display the date on which you send the letter)

· Sender’s first name (this will automatically display the first name of the user who sends the letter)

· Sender’s last name (this will automatically display the last name of the user who sends the letter)

· Sender’s email address (this will automatically display the email address of the user who sends the letter)

· Recipient’s first name (this will automatically display the first name of the candidate you are sending the letter to)

· Recipient’s last name (this will automatically display the last name of the candidate you are sending the letter to)

· Recipient’s email address (this will automatically display the email address of the candidate you are sending the letter to)

· Job Title from Job ad (this will automatically display the title of the job ad the candidate applied to)

· Job Seeker’s Unique Resume Identifier (this will automatically display the resume value of the candidate’s resume)

The Hiring Library is where you can store copies of the Job Ads and Letters you create while using Monster.

You can reach the Hiring Library by going to Your Account > Hiring Library. You can use this space to view, edit, copy or delete the saved jobs and letters, or to create new jobs and letters.

You can also view the Hiring Library items that other users at your company have chosen to make public. To learn more, review our Hiring Library article.

Still have questions?

We’re here to help. Contact Customer Support now.